This winter I've been busy renovating.
I started on the living room but while waiting for the hardwood floors to dry I got started on the bathroom.
And I couldn't stop.
Here's a photo journal of the experience.
Photo - this is the BEFORE pink bathroom.
The original sink, tub and toilet were pinkish like the tile.
We replaced about 10 years ago with white.
We replaced about 10 years ago with white.
Now it's past time for that pink tile colour to go.
 There were also some other problems.
No fan in the room and so the ceiling had moisture spots.
The light fixtures were original and so they will be replaced.
The vanity has a faux pinkish laminate.
This was popular in the 1960's because my childhood dresser had the same pinkish laminate.
After removing the shower curtain and everything else from the room I scraped the ceiling of the loose and peeling paint.
 After scraping for a while I ended up duct taping a scraper to a painting pole.
This allowed me to give my knees a break from climbing up and down the ladder.
I could easily scrape while standing on the floor.
Prior to painting the tile I took a rough sandpaper and sanded both the tiles and the laminate to rough it up a bit.
I used CIL Smart Anywhere white primer as a base coat for the tile and the laminate.
There was even enough of the primer left over to do two coats on the ceiling.
 When that was dry I did two more coats on the ceiling with the Behr white satin finish - the same one I used on the tiles and trim.
I used is Behr water-based acrylic paints with primer in the paint.
I debated a lot about whether to remove the tiles.
I considered the time and effort to repair the wall to get it smooth or replace with something else like bead board.
I realized the easiest and most straightforward fix was to just paint the tile.
So I did.
The vanity. trim and baseboards were painted with the white satin paint.

The drawer pulls were bronze.
I painted over the drawer pulls in white as a lazy and cheap fix.
The drawer pulls were bronze.
I painted over the drawer pulls in white as a lazy and cheap fix.
I did three coats of white on the tiles.
(The bathroom is small so there was no shortage of paint for extra coats).
Bye bye pink and hello gray inspiration.....
 The CIL Smart Any Where primer used on the laminate has a strong "profile" so it grips well with the next layers of paint that are laid down.
My colour scheme for the new bathroom is by Behr as well, again with primer in with the paint.
For the walls above the tile I painted in a dark gray Behr 760F-6 Distant Thunder.
I wanted a dark and dramatic look.
I debated a lot about dark on the bottom or the top and finally decided on a non-traditional dark top and light bottom.
I did two coats of the gray.
I am super pleased with the result.
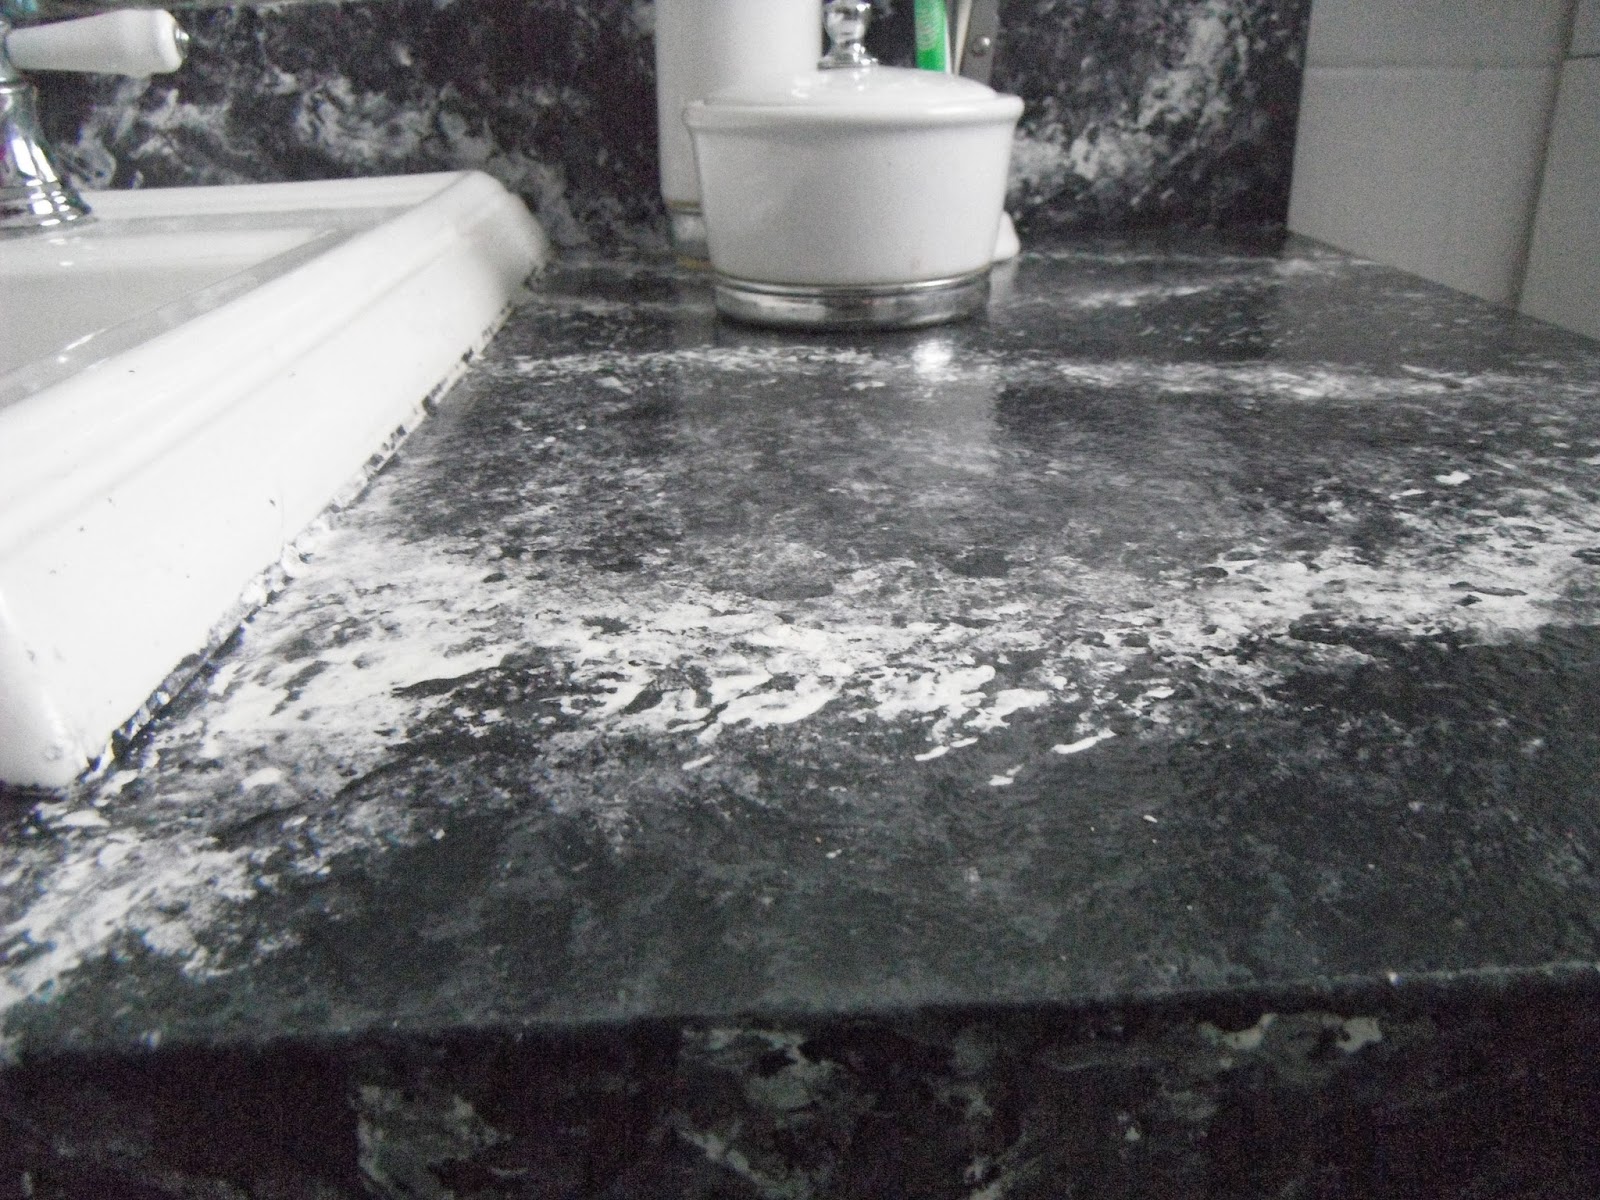
I also did a faux marble on the laminate.
I used all the colours on one colour card (listed below) and then added in a soft white.
I bought the tester size of the colours.
There was plenty to finish the entire job.
The testers only cost about $9.00 each and I have over half left in each
I used all the colours on one colour card (listed below) and then added in a soft white.
I bought the tester size of the colours.
There was plenty to finish the entire job.
The testers only cost about $9.00 each and I have over half left in each

It was recommended for the faux laminate that I use the flat paint with primer in the paint.
Flat was selected since it has more of a profile to grip with the sealer which would go on top.
Flat was selected since it has more of a profile to grip with the sealer which would go on top.

With Primer in the Paint:
UL-201 White - Moon Rise
And colour chart at left:
760F-4 Down Pour
760F-5 Milestone
760F-6 Distant Thunder* (walls)
760F-7 Sorcerer

After doing the faux marble I did three coats of a water based non-yellowing sealer.
The sealer was not smelly and each coat was completely dry in three hours.
Two wooden storage boxes bought years ago at Ikea were painted white and the drawer fronts painted gray.
They are resting on the toilet.
 I already had many white accessories and some could easily be painted white or gray.
A small plastic stool I painted dark gray.
Wicker containers I painted white.
When doing the faux marble I used a rag for each colour.
I would dip the rag into the paint container and then tap it onto the laminate.
I focused on doing streams of white that branch out in the marble.

The mirror I hung on the door, from Pier1, was originally bronze and I painted it white and then gave it three coats of Martha Stewart Silver paint.
The curtains are not bathroom curtains but they were so perfect I got them. Habitat "Rebecca" panels from Home Depot.
The white shower curtain is a mould resistant fabric.
I needed two shower curtain rods and hung them side-by-side.
I needed two shower curtain rods and hung them side-by-side.
I've always put knick-knacks on the windowsill in the bathroom and most of these I already had in the home.
The lanterns are from Pier1.
The lanterns are from Pier1.
 When shopping for lighting I absolutely fell in love with the black chandeliers (I think they're more charcoal coloured) from www.livinglighting.com here in London Ontario.
I learned how to install lighting on U-Tube, along with a few questions at the store.
I did them myself. First time to install an electrical appliance.
It was scary but I got a great feeling of accomplishment by doing it myself.
 Other accessories like the bamboo star and wire container were gold and I painted them white.
I also made a shelf painted gray to go over the door. It will hold baskets painted white where I can put extra new shampoo bottles, body soap, etc.
This helps to reduce congestion in the small bathroom.
I got the shelf idea from my next favourite online program - Pinterest.
 In fact, the ideas for the bathroom all came from Pinterest. Instead of collecting photos from magazines I created a Bathroom folder on Pinterest and them started to pin every photo of a bathroom or bathroom accessory that I liked.
Then I narrowed down my choices as I decided on the colour - gray. I pinned photos of mirrors and chandeliers. I considered wallpaper versus paint, etc.
So I must thank all those people out there that took the time to post their favourite bathroom renovations because it helped me with my choices.
 It also meant that there were no surprises in this renovation. I'd seen every colour and style chosen in photos on Pinterest before trying it myself.
Here's a link to my Pinterest photo collection Bathroom - Bathroom - Gray Inspiration. I hope you find it inspiring as I did.
It was scary but I got a great feeling of accomplishment by doing it myself.
Other accessories like the bamboo star and wire container were gold and I painted them white.I also made a shelf painted gray to go over the door. It will hold baskets painted white where I can put extra new shampoo bottles, body soap, etc.
This helps to reduce congestion in the small bathroom.
I got the shelf idea from my next favourite online program - Pinterest.
In fact, the ideas for the bathroom all came from Pinterest. Instead of collecting photos from magazines I created a Bathroom folder on Pinterest and them started to pin every photo of a bathroom or bathroom accessory that I liked.Then I narrowed down my choices as I decided on the colour - gray. I pinned photos of mirrors and chandeliers. I considered wallpaper versus paint, etc.
So I must thank all those people out there that took the time to post their favourite bathroom renovations because it helped me with my choices.
It also meant that there were no surprises in this renovation. I'd seen every colour and style chosen in photos on Pinterest before trying it myself.Here's a link to my Pinterest photo collection Bathroom - Bathroom - Gray Inspiration. I hope you find it inspiring as I did.
I've saved a lot of money doing the renovations myself which left me with cash to buy the lighting and accessories.
I didn't realize before how addictive DIY can be. I just love it and I'm planning other projects.
Here's a link to my U-Tube videos on how to do the faux marble.